 Kia Optima: Removal
| 1. |
Remove the battery and the battery
tray. (Refer to "Charging system" in EE group.) |
| 2. |
Remove the under cover (A).
Tightening torque:7.8 ~
11.8 N.m (0.8 ~ 1.2 kgf.m, 5.8 ~ 8.7 lb-ft)
|

|
| 3. |
Replace new gasket and the plug
after draining the automatic transaxle fluid by removing the drain plug.
(Refer to "Hydraulic system (Fluid)" in this group) |
| 4. |
Remove the valve body cover (B)
and eyebolt (A).
Tightening torque:(A) 34.3
~ 44.1 N.m (3.5 ~ 4.5 kgf.m, 25.3 ~ 32.6 lb-ft)
(B) 13.8 ~ 14.7 N.m (1.3 ~ 1.5 kgf.m, 9.4 ~ 10.8 lb-ft)
|
|
Always replace the gasket of the eyebolt use new one whenever loosening
eyebolt. |
|
Remove installation bolts in the engine compartmentfirst and then
remove others under the vehicle. |

|
| 5. |
Remove the plate and the detent
spring (A) after removing the bolt.
Tightening torque:24.5
~ 35.3 N.m (2.5 ~ 3.6 kgf.m, 18.1 ~ 26.0 lb-ft)
|

|
| 6. |
Remove the bolt (3ea) after disconnecting
the solenoid valve connector (A) and the oil temperature sensor connector
(B).
Tightening torque:9.8 ~
11.8 N.m (1.0 ~ 1.2 kgf.m, 7.2 ~ 8.7 lb-ft)
|
|
Be careful not to damage the harness lock connector. |

|
| 7. |
Remove the valve body assembly
(A).
Tightening torque:9.8 ~
11.8 N.m (1.0 ~ 1.2 kgf.m, 7.2 ~ 8.7 lb-ft)
|

|
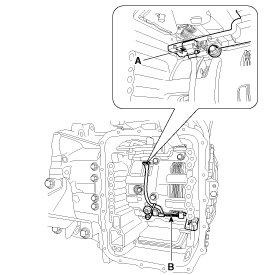
| 8. |
Disconnect the input & output
speed sensor connector(A). |
| 9. |
Remove the input & output speed
sensor (B) after removing the bolts(2ea).
Tightening torque:9.8 ~
11.8 N.m (1.0 ~ 1.2 kgf.m, 7.2 ~ 8.7 lb-ft)
|

|
1.
Check signal waveform of Input
& output speed sensor using the GDS.
Specification: Refer to "Signal
Wave Form" section.
...
1.
Installation is the reverse of
removal.
After replacement or reinstallation procedure of the valve body assembly, ...
See also:
Changing tires
1. Park on a level surface and apply
the parking brake firmly.
2. Shift the shift lever into R
(Reverse) for manual transaxle or
P (Park) for automatic transaxle.
3. Activate the hazard wa ...
Snow Tires
If you mount snow tires on your Kia, make sure they are radial tires of the same
size and load range as the original tires. Mount snow tires on all four wheels to
balance your vehicle’s handling i ...
Removal
In case of removing the high pressure fuel pump,
high pressure fuel pipe, delivery pipe, and injector, there may be injury
caused by ...
 Kia Optima: Removal
 Inspection
 Installation


