 Kia Optima: Using USB device
![]() CAUTION IN USING USB DEVICE
CAUTION IN USING USB DEVICE
- To use an external USB device, make sure the device is not connected when starting up the vehicle. Connect the device after starting up.
- If you start the engine when the USB device is connected, it may damage the USB device. (USB flashdrives are very sensitive to electric shock.)
- If the engine is started up or turned off while the external USB device is connected, the external USB device may not work.
- It may not play inauthentic MP3 or WMA files.
1) It can only play MP3 files with the compression rate between 8Kbps~320Kbps.
2) It can only play WMA music files with the compression rate between 8Kbps~320Kbps. - Take precautions for static electricity when connecting or disconnecting the external USB device.
- An encrypted MP3 PLAYER is not recognizable.
- Depending on the condition of the external USB device, the connected external USB device can be unrecognizable.
- When the formatted byte/sector setting of External USB device is not either 512BYTE or 2048BYTE, then the device will not be recognized.
- Use only a USB device formatted to FAT 12/16/32.
- USB devices without USB I/F authentication may not be recognizable.
- Make sure the USB connection terminal does not come in contact with the human body or other objects.
- If you repeatedly connect or disconnect the USB device in a short period of time, it may break the device.
- You may hear a strange noise when connecting or disconnecting a USB device.
- If you disconnect the external USB device during playback in USB mode, the external USB device can be damaged or may malfunction. Therefore, disconnect the external USB device when the audio is turned off or in another mode. (e.g, Radio, SIRIUS or CD)
- Depending on the type and capacity of the external USB device or the type of the files stored in the device, there is a difference in the time taken for recognition of the device.
- Do not use the USB device for purposes other than playing music files.
- Use of USB accessories such as rechargers or heaters using USB I/F may lower performance or cause trouble.
- If you use devices such as a USB hub purchased separately, the vehicle’s audio system may not recognize the USB device. In that case, connect the USB device directly to the multimedia terminal of the vehicle.
- If the USB device is divided by logical drives, only the music files on the highest-priority drive are recognized by car audio.
- Devices such as MP3 Player/ Cellular phone/Digital camera can be unrecognizable by standard USB I/F can be unrecognizable. • Some non-standard USB devices (METAL COVER TYPE USB) can be unrecognizable.
- Some USB flash memory readers (such as CF, SD, microSD, etc.) or external-HDD type devices can be unrecognizable.
- Music files protected by DRM (DIGITAL RIGHTS MANAGEMENT) are not recognizable.
- The data in the USB memory may be lost while using this audio. Always back up important data on a personal storage device.
- Please avoid using USB memory products which can be used as key chains or cellular phone accessories as they could cause damage to the USB jack. Please make certain only to use plug type connector products as shown below.


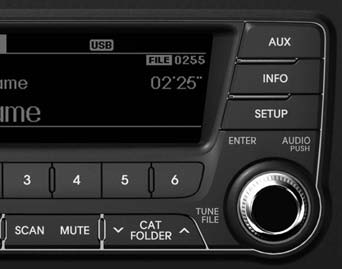
1. AUX Button (USB or AUX)
If the auxiliary device is connected, it switches to AUX or USB mode to play the sound from the auxiliary player.
If there is no auxiliary device, then the message “No Media” will become displayed on the LCD for 3 seconds and returns to previous mode.
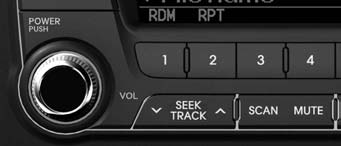
2. 1 Button (RANDOM)
- Press this button for less than 0.8 seconds to play songs randomly in current folder.
- Press this button for 0.8 seconds or longer to play songs randomly in entire USB device.
- To cancel RANDOM play, press this button again.
3. 2 Button (REPEAT)
- Press this button for less than 0.8 seconds to repeat current song.
- Press this button for 0.8 seconds or longer to repeat all songs in current folder.
- To cancel REPEAT, press this button again.
4. TRACK Button
- Press the
 button for less
than 0.8 seconds to play from the beginning of the current song. Press the button
for less than 0.8 sec onds and press it again within 1 second to move to and
play the previous song. Press the button for 0.8 seconds or longer to play the
song in reverse direction in fast speed.
 - Press the
 button for less
than 0.8 seconds to move to the next song. Press the button for 0.8 seconds
or longer to play the song in forward direction in fast speed.

5. SCAN Button
Plays each song in the USB device for 10 seconds.
To cancel SCAN Play, press this button again.
6. INFO Button
Displays the information of the file currently played in the order of FILE NAME ➟ TITLE ➟ ARTIST ➟ ALBUM ➟ FOLDER ➟ TOTAL FILE ➟ NORMAL DISPLAY ➟ FILE NAME… (Displays no information if the file has no song information.)

7. FOLDERButton
- Press
 button to move to child
folder of the current folder and display the first song in the folder. Press
TUNE/ ENTER knob to move to the folder displayed. It will play the first song
in the folder.
 - Press
 button to move to parent
folder display the first song in the folder. Press TUNE/ENTER knob to move to
the folder displayed.
8. TUNE Knob & ENTER Button
- Turn this knob clockwise to browse songs after current song, or counter clockwise to browse songs before current song. To play the displayed song, press the knob.
- Pressing this knob without turning enters to AUDIO CONTROL mode.
 Using CD Player
1. CD Button
If the CD is loaded, turns to CD mode. If no CD, it displays “No Media” for 3
seconds and returns to the previous mode.
2. 1 Button (RANDOM)
Press this button for less than 0.8 sec ...
 Using iPod®
✽ NOTICE FOR USING THE iPod® DEVICE
Some iPod® models might not support the communication protocol and the
files will not be played. Supported iPod® models: - iPod® Mini - iPod® 4th(Phot ...
See also:
RCV Control Solenoid Valve. Description and Operation
Description
RCV (Recirculation Valve) Control Solenoid Valve is installed
on the intercooler inlet pipe and operates the RCV actuator which controls the
by-pass passage of the turbocharger comp ...
Bulb wattage
...
Jump Starting
Jump starting can be dangerous if done incorrectly. Therefore, to avoid harm
to yourself or damage to your vehicle or battery, follow the jump starting procedures
on this page. If in doubt, we str ...
